Access’s database is a collection of multiple tables. Once the database is created, tables have to be created to work. To create a table, the structure of tables has to be designed in the tables. It is necessary to set the field name, data type, description and properties for each field.
Rules for field name :-
- The name of the field should be a maximum of 64 characters.
- The name of the field can contain letters, digits and spaces.
- The name should not contain an exclamation point (!) or square brackets.
- The name of two fields in a table should not be the same.
Create table in MS Access
Step-1:- We will select the tables object from the Object pane.
Step-2:- The following methods will be displayed in the right pane.
- Creating a table through design view.
- Creating a table through wizard.
- Creating a table by entering data.
Using Design View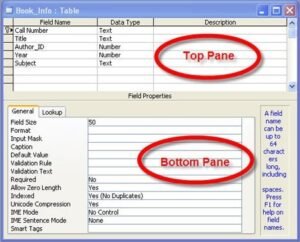
Step-1:- We will select the create table in design view option from the right pane of the database window.
Step-2:- In the database window, click on the design option. The table design window will be displayed. This window will be divided into two parts. The name, data type and description of the field is given through the top pane and the properties are set through the bottom pane.
Data Type in MS Access
- Auto Number:- This data type is used to generate unique number or random number. This number gets generated after the row is added.
- Currency:- This data type is used to store currency values.
- Date\Time:- This data type is used to store date\time type data.
- Hyperlink:- This data type is used to store link or URL.
- Memo:- It is used to store lengthy data. This data type can store 32767 characters.
- Number:- This data type is used to store numeric value.
- OLE Object:- This data type is used to store multimedia data like image, sound, video or file.
- Text:- This data type is used to store text, alphabets, numbers or special characters.
- Yes/No:- Boolean data such as yes/no, true/false can be stored in this data type.
Properties:
- Field Format:- This property is used to set the format of the data stored in the field.
- Decimal Places:- The number of 0s displayed after decimal in number or currency type data is determined by this property.
- Input Mask:- This property is used to display the format of the data stored in the field.
- Caption:- This property is used to display the title along with the name of the field. Which will be displayed in the report or form.
- Default Value:- This property is used to set a value in the field. Which will be filled if no data is entered.
- Validation Rule:- This property is used to inset the value in a field based on a condition.
- Validation:- The error message displayed when the condition is met is set in this property.
- Required:- After setting yes in this property, it becomes necessary to type data in the selected field.
Step-3:- We will select the primary key field and click on the primary key option.
Step-4:- Click on save option from Standard toolbar and table name will be provided.
Step-5:- Finally click on the ok button.
Using Wizard
Step-1:- Select the “create table using wizard” option from the right pane of the Database window.
Step-2:- Click on the new button from the Database window and follow the instructions and steps to create the table.
Steps to Add Record in Table
Step-1:- Double click on the name of the table in which we want to add reward.
Step-2:- The table will open, now we can add records according to the fields.
Steps to Delete records in Table
Step-1:- Double click on the name of the table whose records you want to remove.
Step-2:- The table will open and select the row that you want to delete.
Step-3:- Right click on the selected row and click on delete records option.
Steps to Sort Records in Table
Step-1:- Double click on the name of the table whose records are to be sorted.
Step-2:- The table will open and select the column which is to be sorted.
Step-3:- From the Standard tool bar, click on the a z ↓ button for ascending order and on the z a ↓ button for descending order.
Steps to Filter records in Table (Filter by Form)
Step-1:- Double click on the table whose records are to be filtered.
Step-2:- Table will open rewards → filter
Step-3:- Select the Filter by form option.
Step-4:- Select the value for any field from the drop down menu.
Step-5:- Finally click on the filter button from the standard tool bar.
Steps to Filter records in Table (Filter by Selection)
Step-1:- Double click on the table whose records are to be filtered.
Step-2:- The table will open, select the value on the basis of which the records are to be filtered.
Step-3:- Records → Filter
Step-4:- Click on the Filter by selection option. The records will be filtered according to the selected value.
Steps to Filter records in Table (Advance Filter)
Step-1:- Double click on the table whose rewards are to be filtered.
Step-2:- The table will open, click on records option from the menu bar and filter option from the opened menu.
Step-3:- Click on advanced filter option from the popup menu.
Step-4:- Filter window will open.
Step-5:- From the Fields option, select the field which is to be filtered and apply criteria and sorting on it and click on the filter tool from the standard tool bar.
Steps to Freeze Column in Table
Step-1:- Double click on the name of the table whose records are to be filtered.
Step-2:- Select the column which is to be frozen.
Step-3:- Select the freeze column option from the Format menu.
Step-4:- The selected column will be frozen.
Steps to Copy Table
Step-1:- From the database window, right click on the table that you want to copy and select the copy option.
Step-2:- Go to the database window where the copied table is to be pasted. Right click in the right pane of the window and select the paste option. The Paste dialog box will open.
Step-3:- After giving the name of the table and selecting the suitable option, click on the OK button. The table will be copied.
Steps to Delete Table
Step-1:- In the database window, right click on the name of the table that is to be deleted and click on the delete option.
Step-2:- Confirmation box will appear. Click on the Yes button. The table will be deleted.
Steps to Import Table
Step-1:- Right click in the database window and select the import option.
Step-2:- Import dialogue box will open, select the database from which the table is to be imported and click on the import button. Import object dialogue box will open.
Step-3:- From this dialogue box, select the table which is to be imported and click on the ok button.
Steps to Export Table
Step-1:- In the database window, right click on the table which is to be exported and click on the export option.
Step-2:- Export table dialogue box will open. From this dialogue box, select the data box in which the table is to be sent and click on the export button. Export box will open.
- Definition and data – Structure and data will be exported through this option.
- Definition – The structure of the table will be exported through this option.
Step-3:- Select the option as per requirement and provide the name to the table.
Step-4:- Finally click on the ok button.
Modify Table Structure
Step-1:- Select the table from the right pane of the Database window.
Step-2:- Select the design option from the Database window. Design view will open.
Step-3:- We will change the structure of the table and save it.
Steps to Find or Replace Data
Step-1:- Open the table in which the data is to be found or replaced.
Step-2:- Select the edit menu from the menu bar and the find and replace dialogue box will open.
Step-3:- To find any data, type the word in the find what option and click on the find button. To replace, type the word to be replaced in find what and type the word to be replaced in replace with and click on the replace button.
Field Level Validation:- In this type of validation, the field is validated so that the data coming in that field is based on a condition. If the data of the field is not according to its data type, then it is impossible to insert data.
For example, if validation is put in the name that it cannot be left blank, numbers or special characters are not allowed. Then this type of validation is called field level validation.
Record Level Validation:- When validation is applied on more than one field then this concept is called record level validation. For example, if validation is applied on name, date of birth and age fields in employee detail table then this validation is called record level validation.